Tim's journal
Week 2
I have worked on the following user story: As a User, I want to know if a cup is available, so that I can get a cup.
Part of this User story was researching which sensor is best suited for the task. Because I already have some experience with embedded devices, I could already name a few, but regardless I thought it would be best to research more options. I have listed some options below:
| Sensor | + | - |
|---|---|---|
| LDR | Cheap and small | Requires analog pin |
| IR Beam Break | Precise | Consist of two parts, more wires |
| IR proximity | Precise | Susceptible to interference from other sensors |
These options seemed the most logical for this implementation, since they can all detect changes in a small range. When looking at the major downsides, the LDR does not seem that great of an option, since it requires analog pins to read the values, and this also means that there should be a consistent light source near the device. Therefore my options boiled down to the IR beam break or IR proximity sensor. I eventually chose the IR beam break sensor, because I already had these available, but they also do not require me to alter the range with a potentiometer, which is required for a IR proximity sensor. This makes them more consistent and precise. It might also be more susceptible to interference from other IR emitters.
Week 3
This week we had to focus on making the product concept better and clearer, so that we can present it to our client and see what he finds best. For this we had to organize another brainstorm session.
For this we have made a learning story with the entire team, since we all do not have much experience with this.
Last time we mainly focused on writing down the ideas, but we found that it might be better to have a visual aspect as well. Therefore we opted to make a sort of moodboard.
During the brainstorm we also roughly followed these steps. This helped us to know how to brainstorm more effectively.
Personally this has helped a lot in getting everyone on the same page. And it also helped me in getting rid of any uncertainties I had about the concept, since we now properly explored multiple ideas which makes me more confident about the choice we have made now.
All in all this has been a good experience and I will certainly repeat this in the future when coming up with concepts.
Week 4
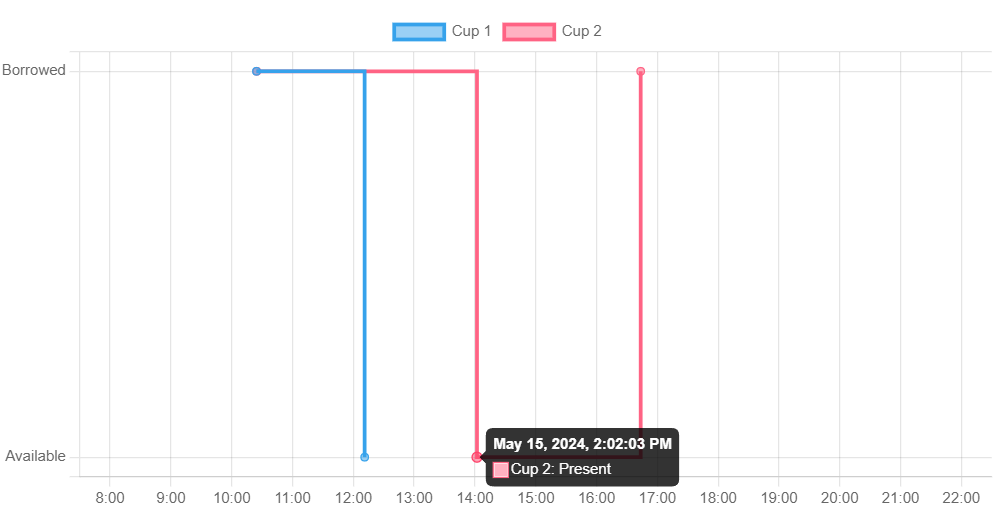
Cup interactions Graph
I have been working on the following user story:
As a User, I want to view the time of when a cup is interacted with, so that I can inspect when the device is used
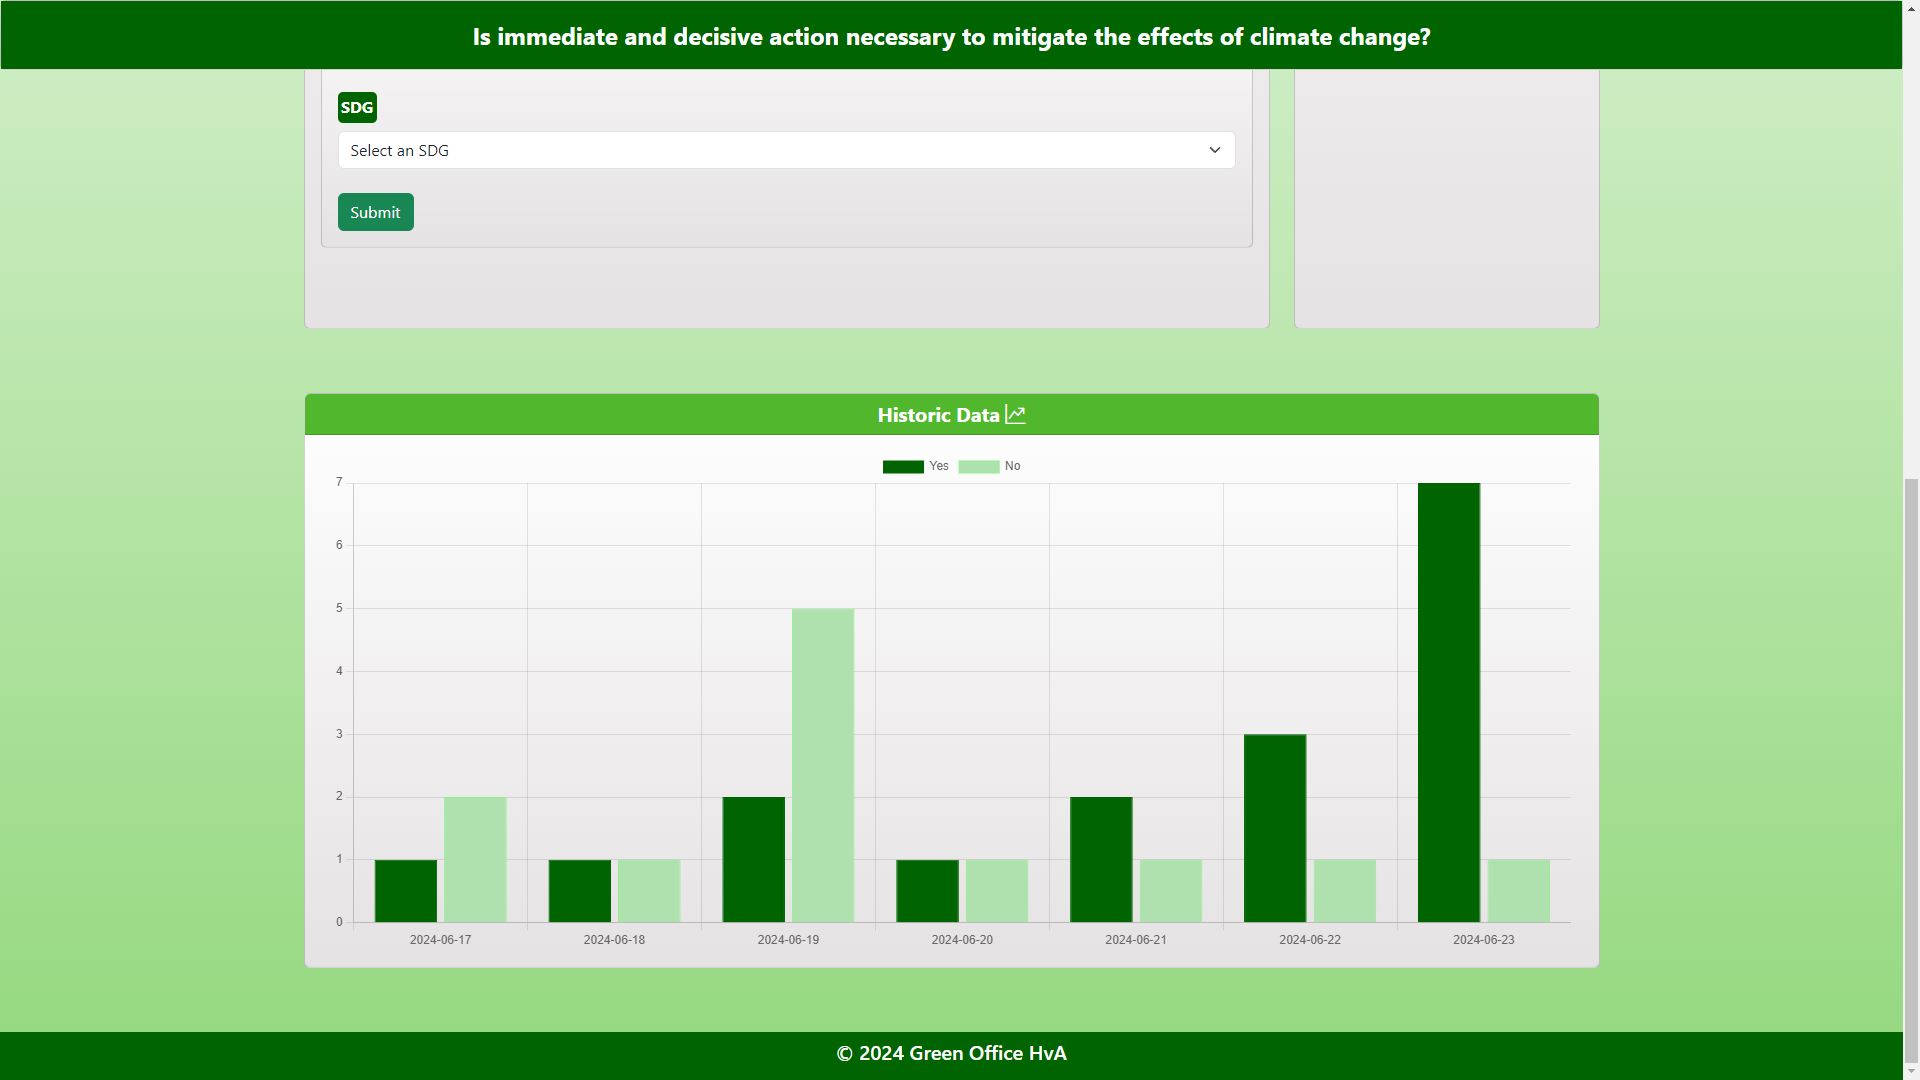
For this I have had to learn how to implement graphs on a webpage. I have never done this before, so therefore I have made a learning story for this. I got recommend to use chart.js. The goal of the graph is to display the daily usage. So it should indicate when a cup is taken and when it is returned.
Firstly I needed the date adapter, to display the time on the x-axis. Afterwards my plan was to also display multiple 'datasets', so this meant for each cup a different line.
Furthermore I worked on general formatting of the graph, this includes only displaying the cup interactions of the current day. I also wanted to give the tick marks of the y-axis different names, besides 0/1, since this does not say anything. And some more general formatting so that the graph looks better, such as including a zoom, for this I used this video and the documentation. I also added an offset for the y-axis and changed the labels in the tooltip.
I also worked on adding a zoom function to the graph, this took quite a while to figure out, since I had to add a limit on the time in the x-axis to only display the hours of the current day. This thread eventually helped me resolve this issue.
Lastly I changed the code to automatically update the chart data every three seconds, for this I got some help from Liera.
All in all it took quite some time and research to make the graph since I have never worked with the library before. Below is the result:
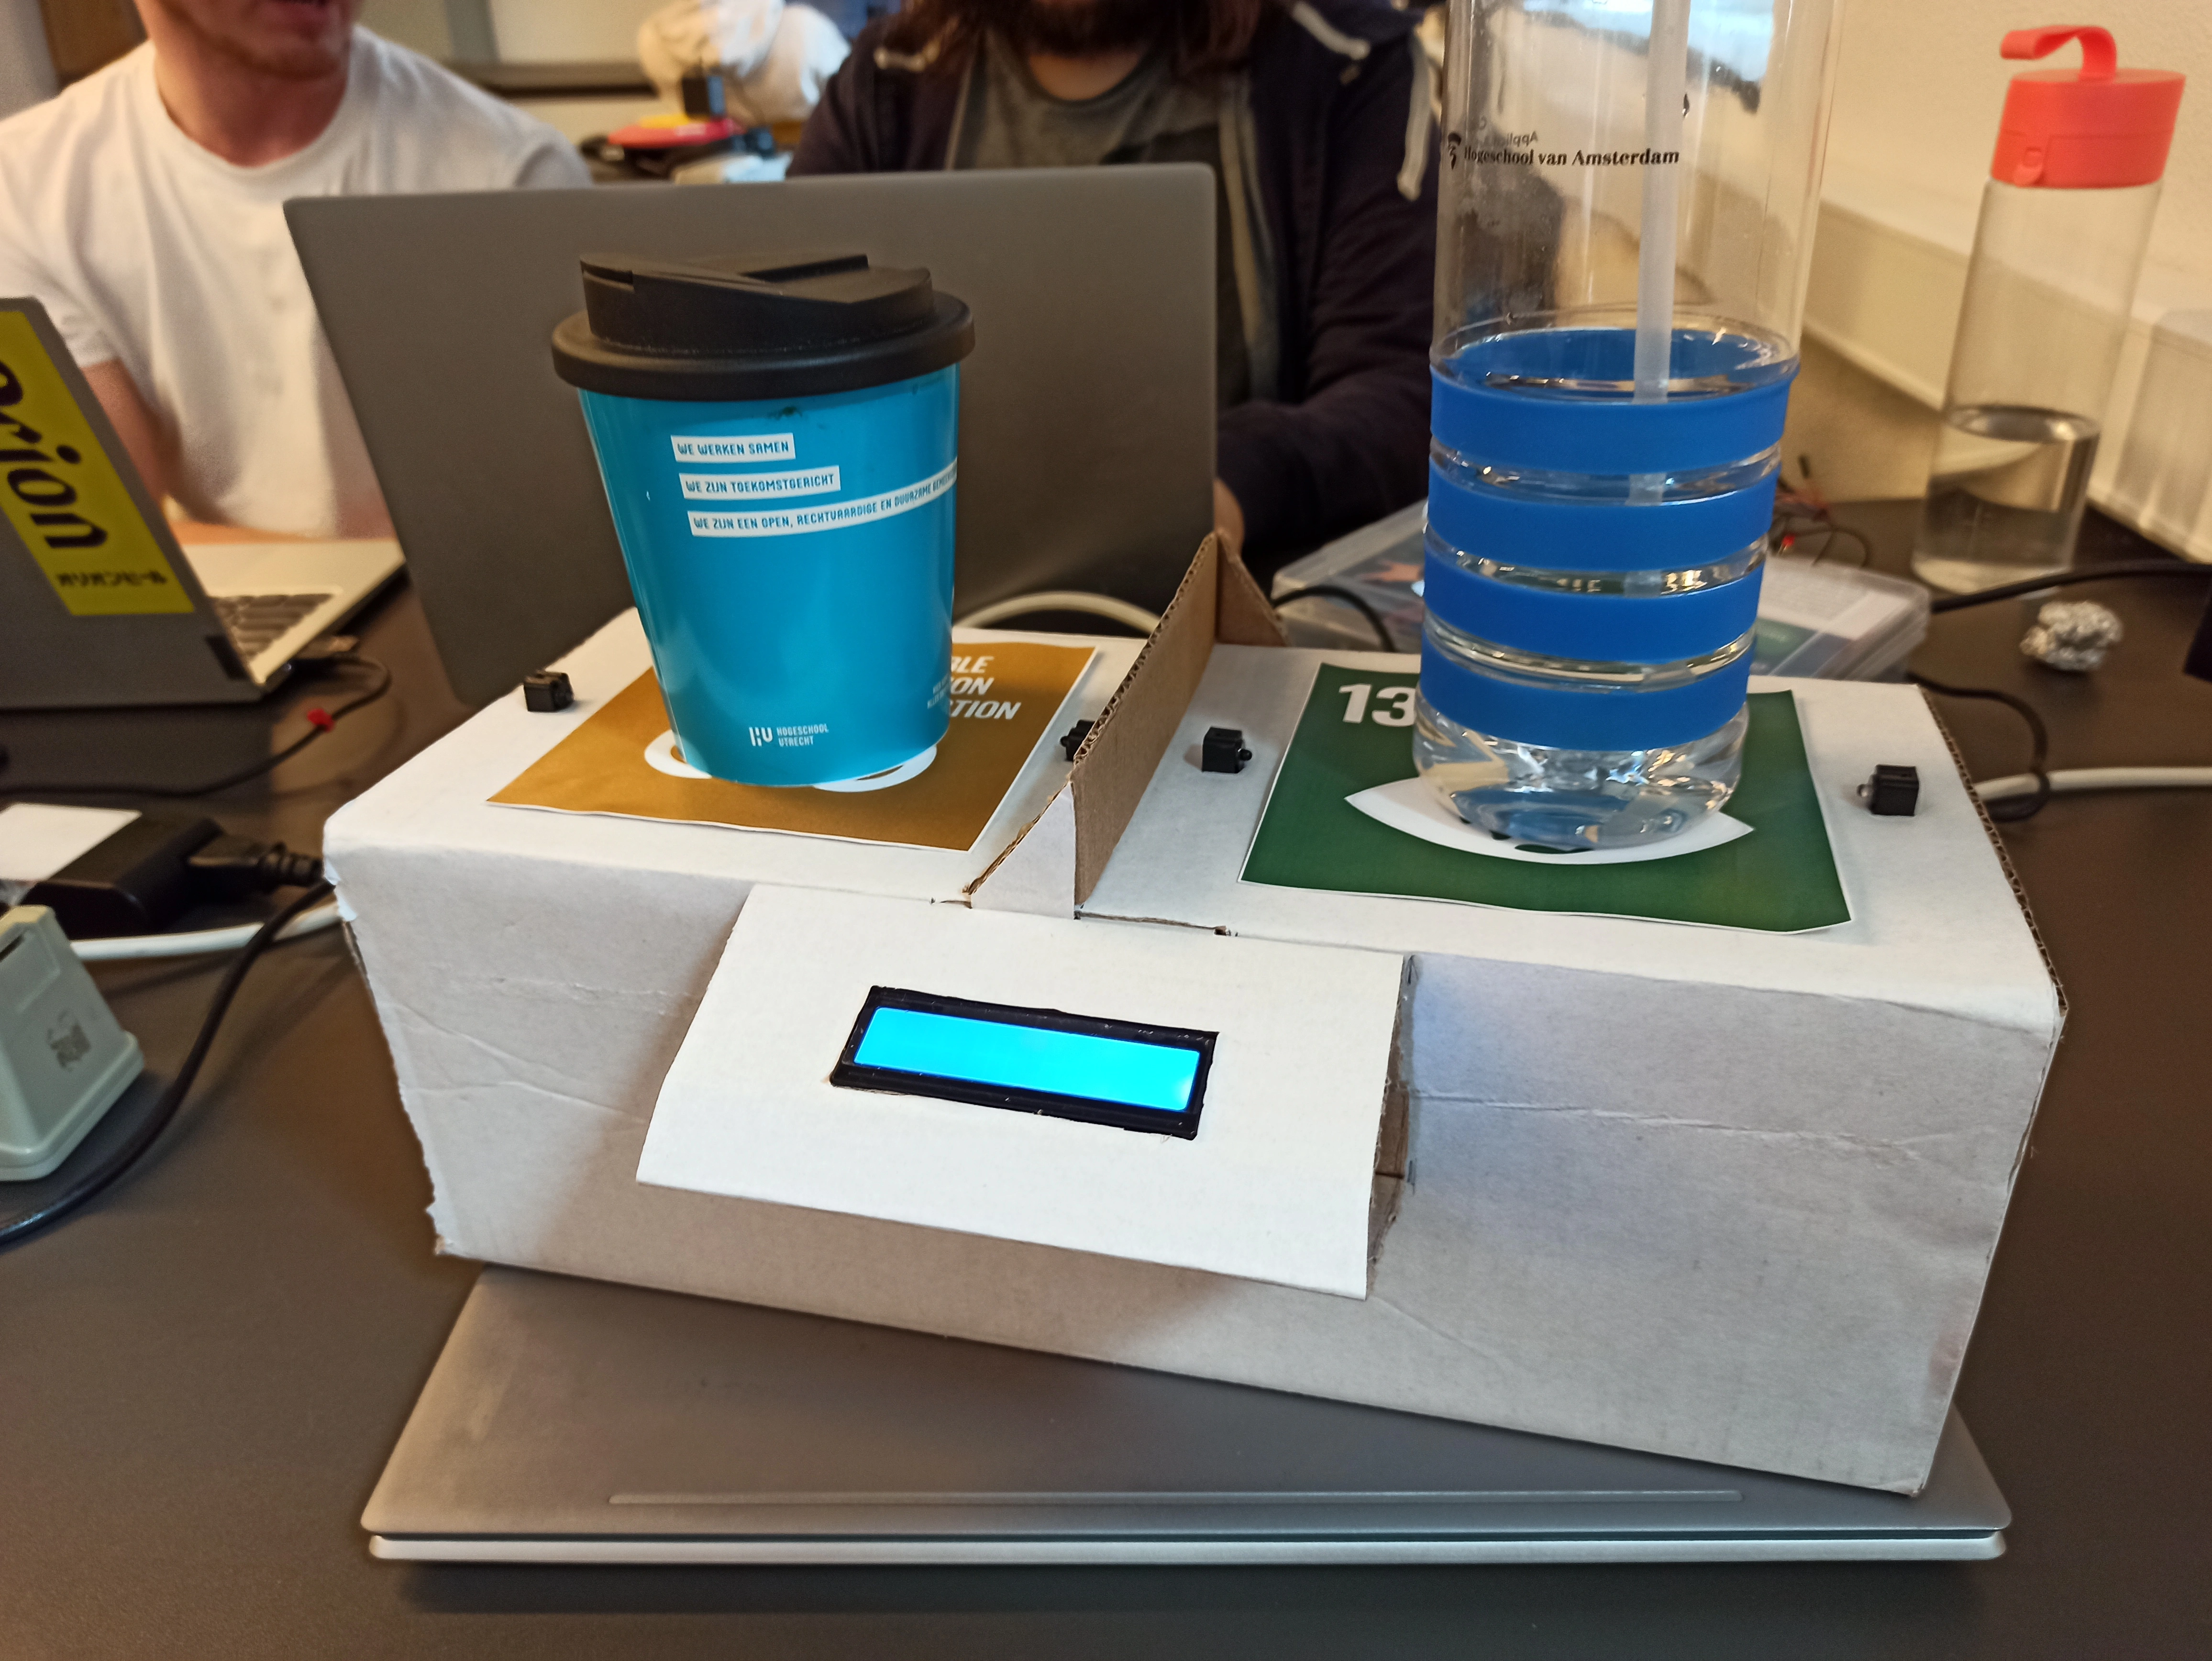
Finishing Sprint 1 prototype
I also worked on the following user story:
As a User, I would like to see sustainability facts when grabbing a cup, so I am learn more about sustainability when interacting with the device
This mainly involved integrating the LCD with the IR sensors and displaying a message when a cup is removed / added. I also had to print an image of the two Sustainable Development Goals which had to be glued to the prototype and install the LCD. The end product of the sprint looks like this:
Week 5
Brainstorming and Sprint preparation
This week we started with a new Sprint. So a lot of my week involved brainstorming and defining new user stories. I put a lot of effort into this on Wednesday and Thursday, therefore I did not have any commits these days. But eventually we did define an idea which our client likes more as well.
Update database
On Friday I worked on the following user story:
As a User, I want to store different questions for each SDG, so that I can differentiate between each SDG
This was quite a simple user story which involved adding a new table for storing the questions, which might be displayed. I also added a simple script for questions for each SDG.
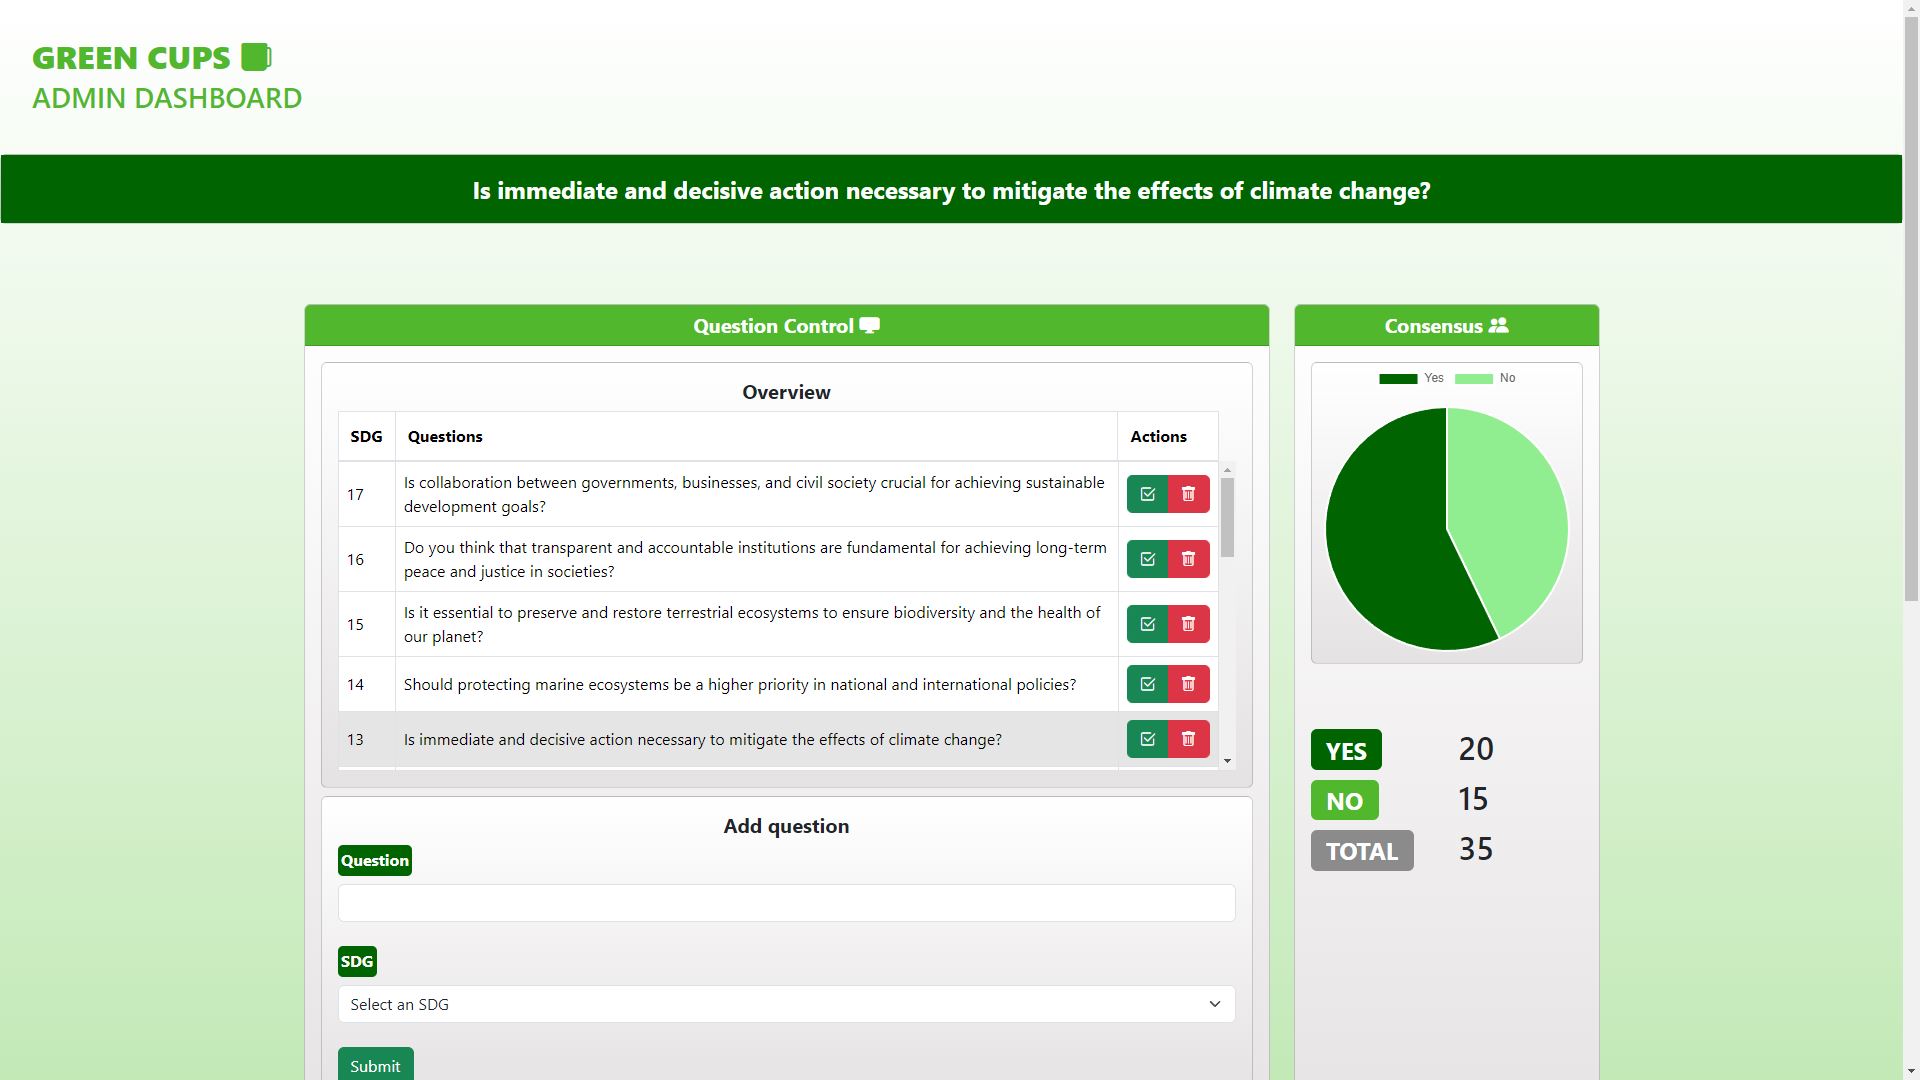
User answer meter
On Friday I also worked on this user story:
As a User, I want to view how other users have responded to the question on the device, so that I know what other users think
We want to add a meter on the device, where the user can see how others have answered. This will be done with a servo and a half circle.
Week 6
Question enter form
I have worked on the following user story:
As a User, I want to be able to enter specific SDG related questions myself on the website, so that users won't get bored seeing the same questions.
This user story is about adding a form on the webpage, where the user can add their own questions, and link them to a SDG. There are many different ways to submit a form, with pure JavaScript or with HTML. So I wanted to find out what the best practice is for submitting forms.
An easy way is by purely using HTML, then using action. However this moves the user away from the initial screen, which is not so nice for the user experience, so I researched an approach to use JavaScript to submit a form. Here I can also add some simple form validation.
Setup new API endpoint
Next was making the API endpoint for inserting the form data. For this I read some things about implementing REST API's . For this I added a simple new endpoint which handles the interactions the Question table in our database.
Before I would make multiple .php files for different operations, so a get.php for obtaining the info and insert.php for inserting information. I learned that it is better to have a single file and handle the CRUD (GET, POST, PUT & DELETE) in there, so it checks the method. This way It looks cleaner and more organized.
I also asked some team members for feedback, they suggested putting the .php file in a folder, so questions and then renaming the file to index.php. This way you only have to call the folder and it automatically calls the correct file. This makes the endpoint call cleaner.
Lastly I implemented the openAPI style documentation on this endpoint, which was introduced by a different team member. This gives a clearer overview of the API's functionality.
The form eventually turned out like this: 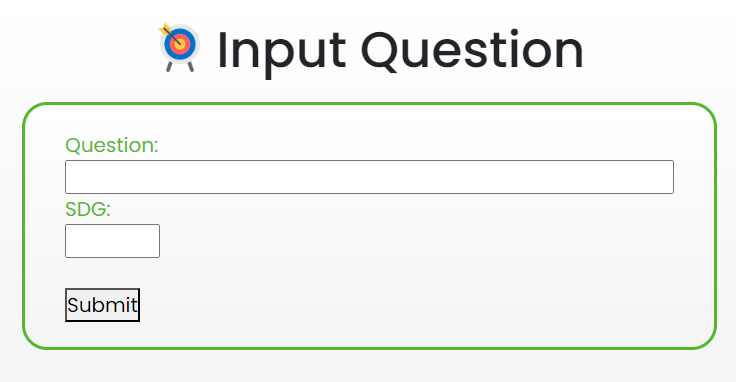
Sending answers to DB
I also worked on the following user story:
As a User, I want to be able to store the data on what the user voted for, so that I can get an insight on what other users think.
For this I mostly refactored the existing code about interactions. But now I also integrated the new API endpoint style. I also added a table for answers, which are connected to the questions table.
For the endpoint I needed to automatically add the answers to the 'selected question', for this I did some research on how to implement this in the backend. I also noticed I could not properly test my endpoint, so for this I downloaded Postman, so that I could actually see what went wrong. This helped a lot in debugging.
Week 7
This week I started with the following user story:
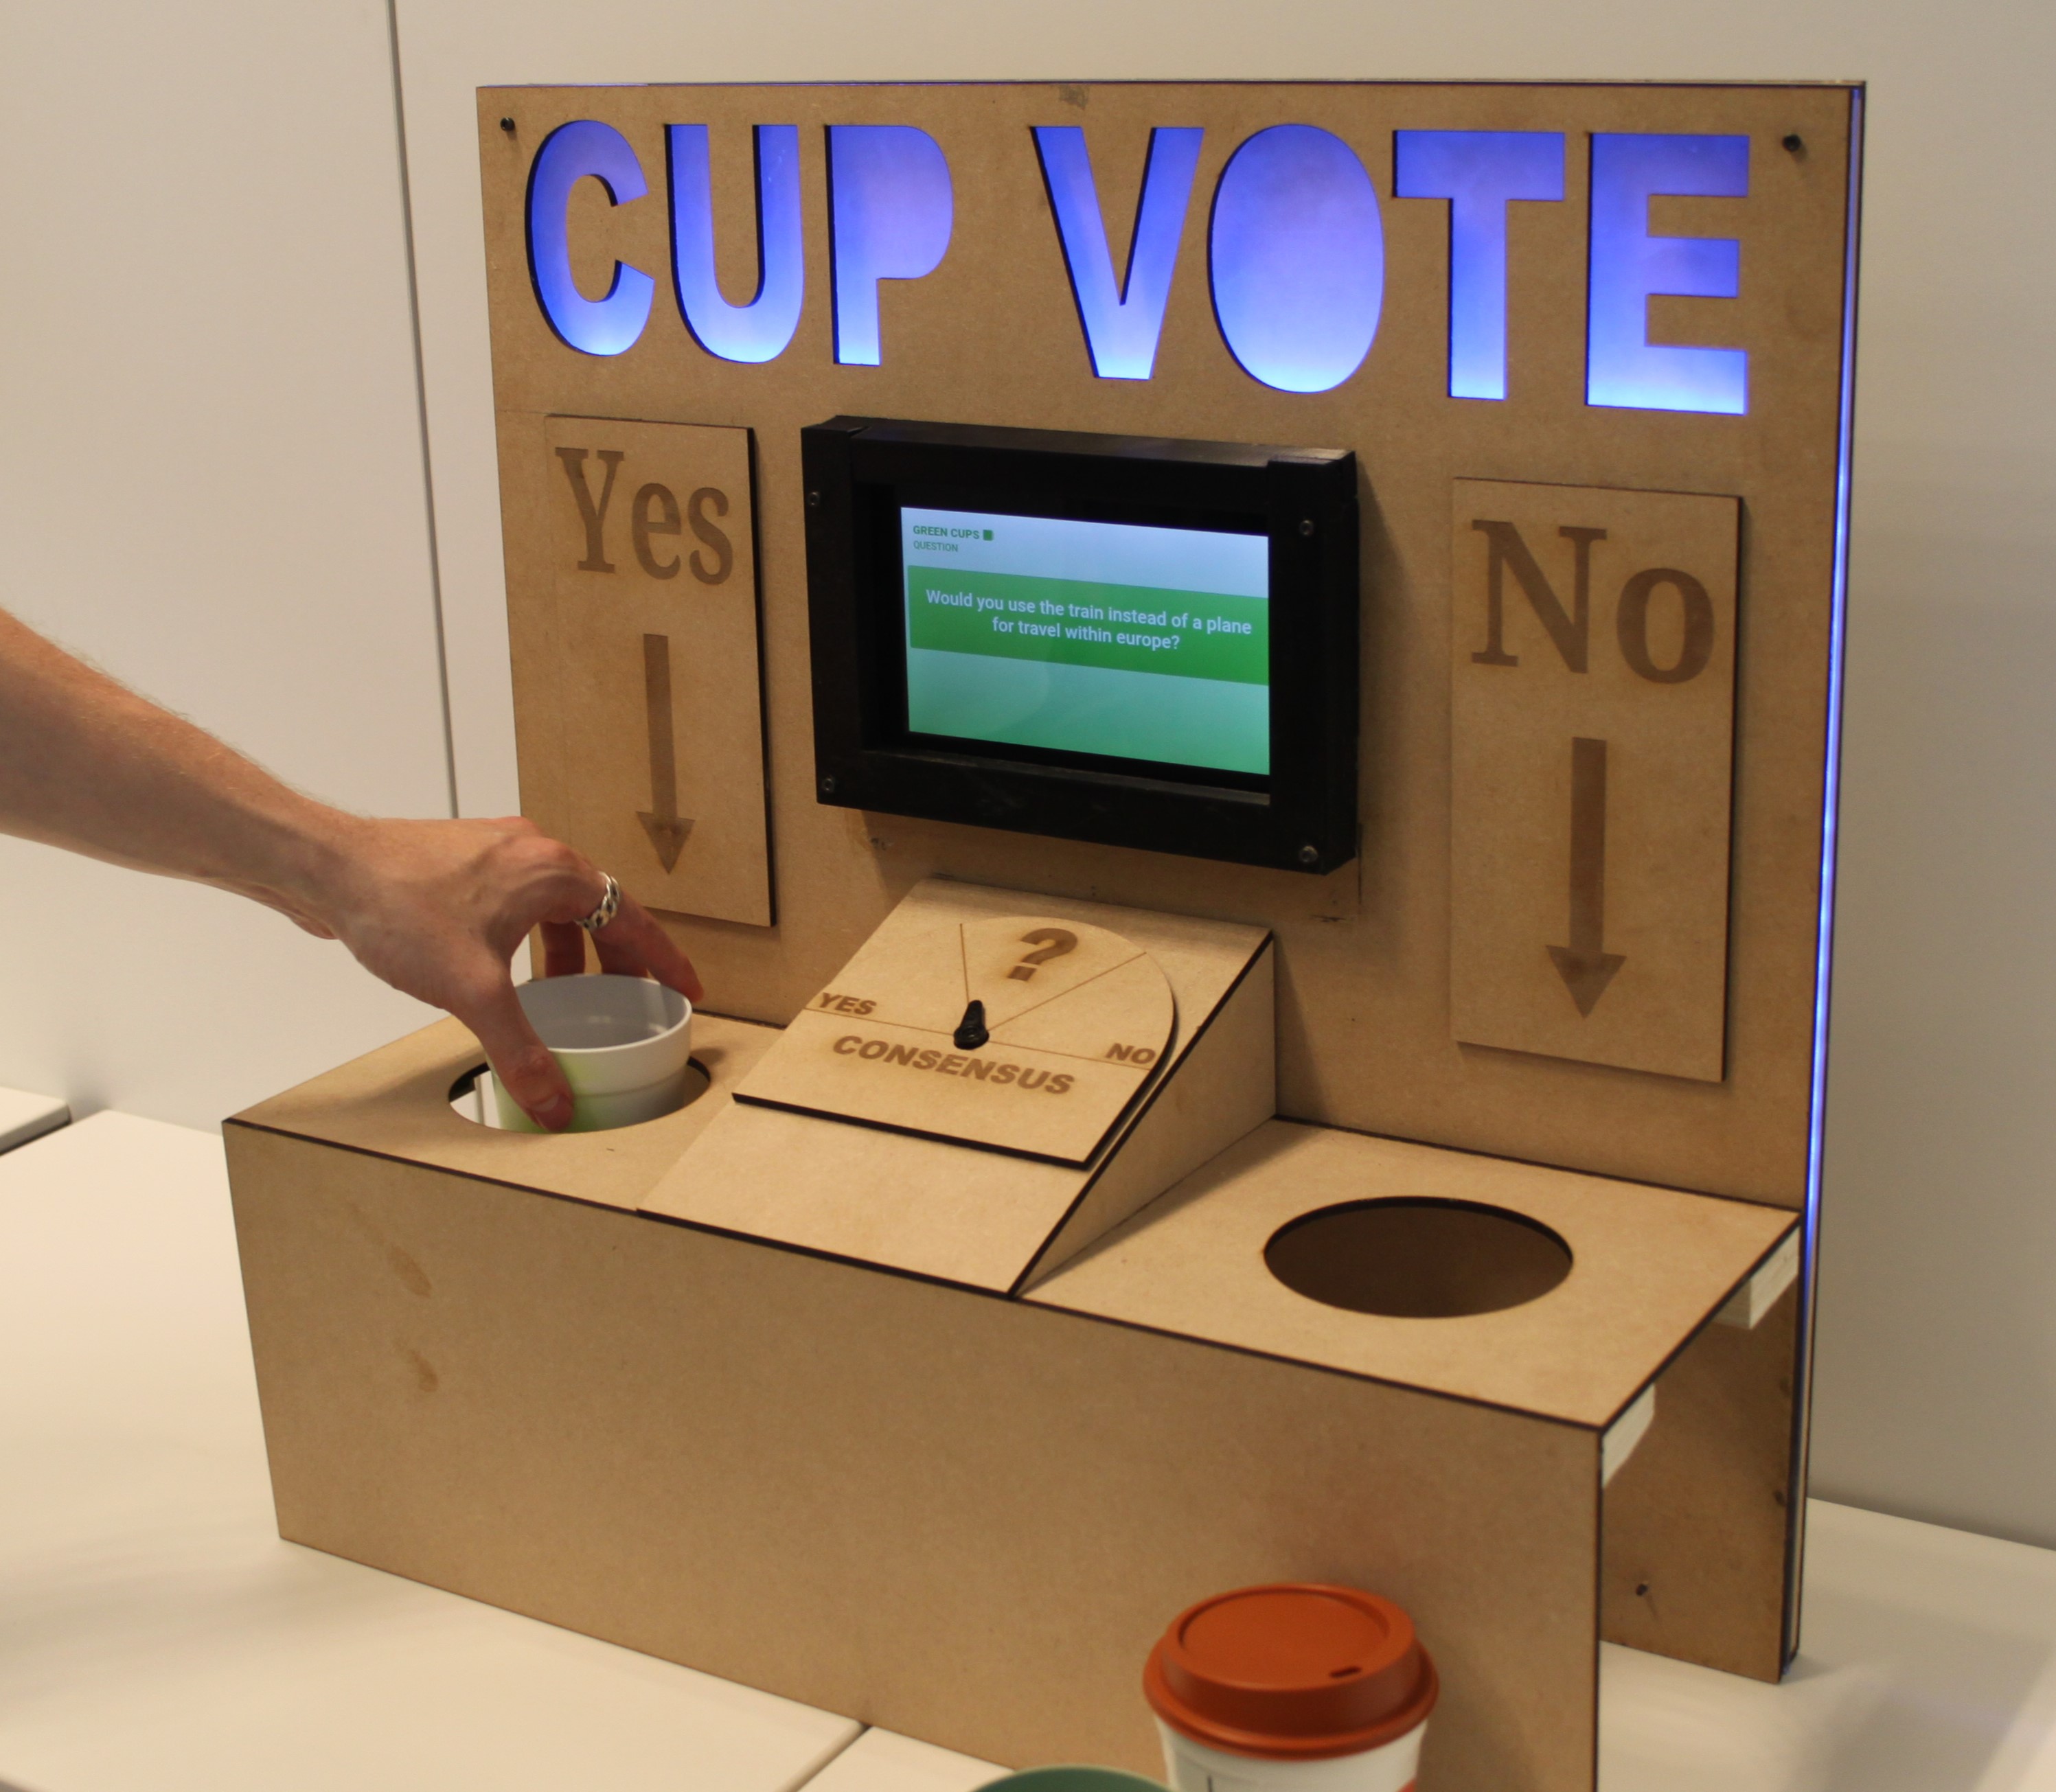
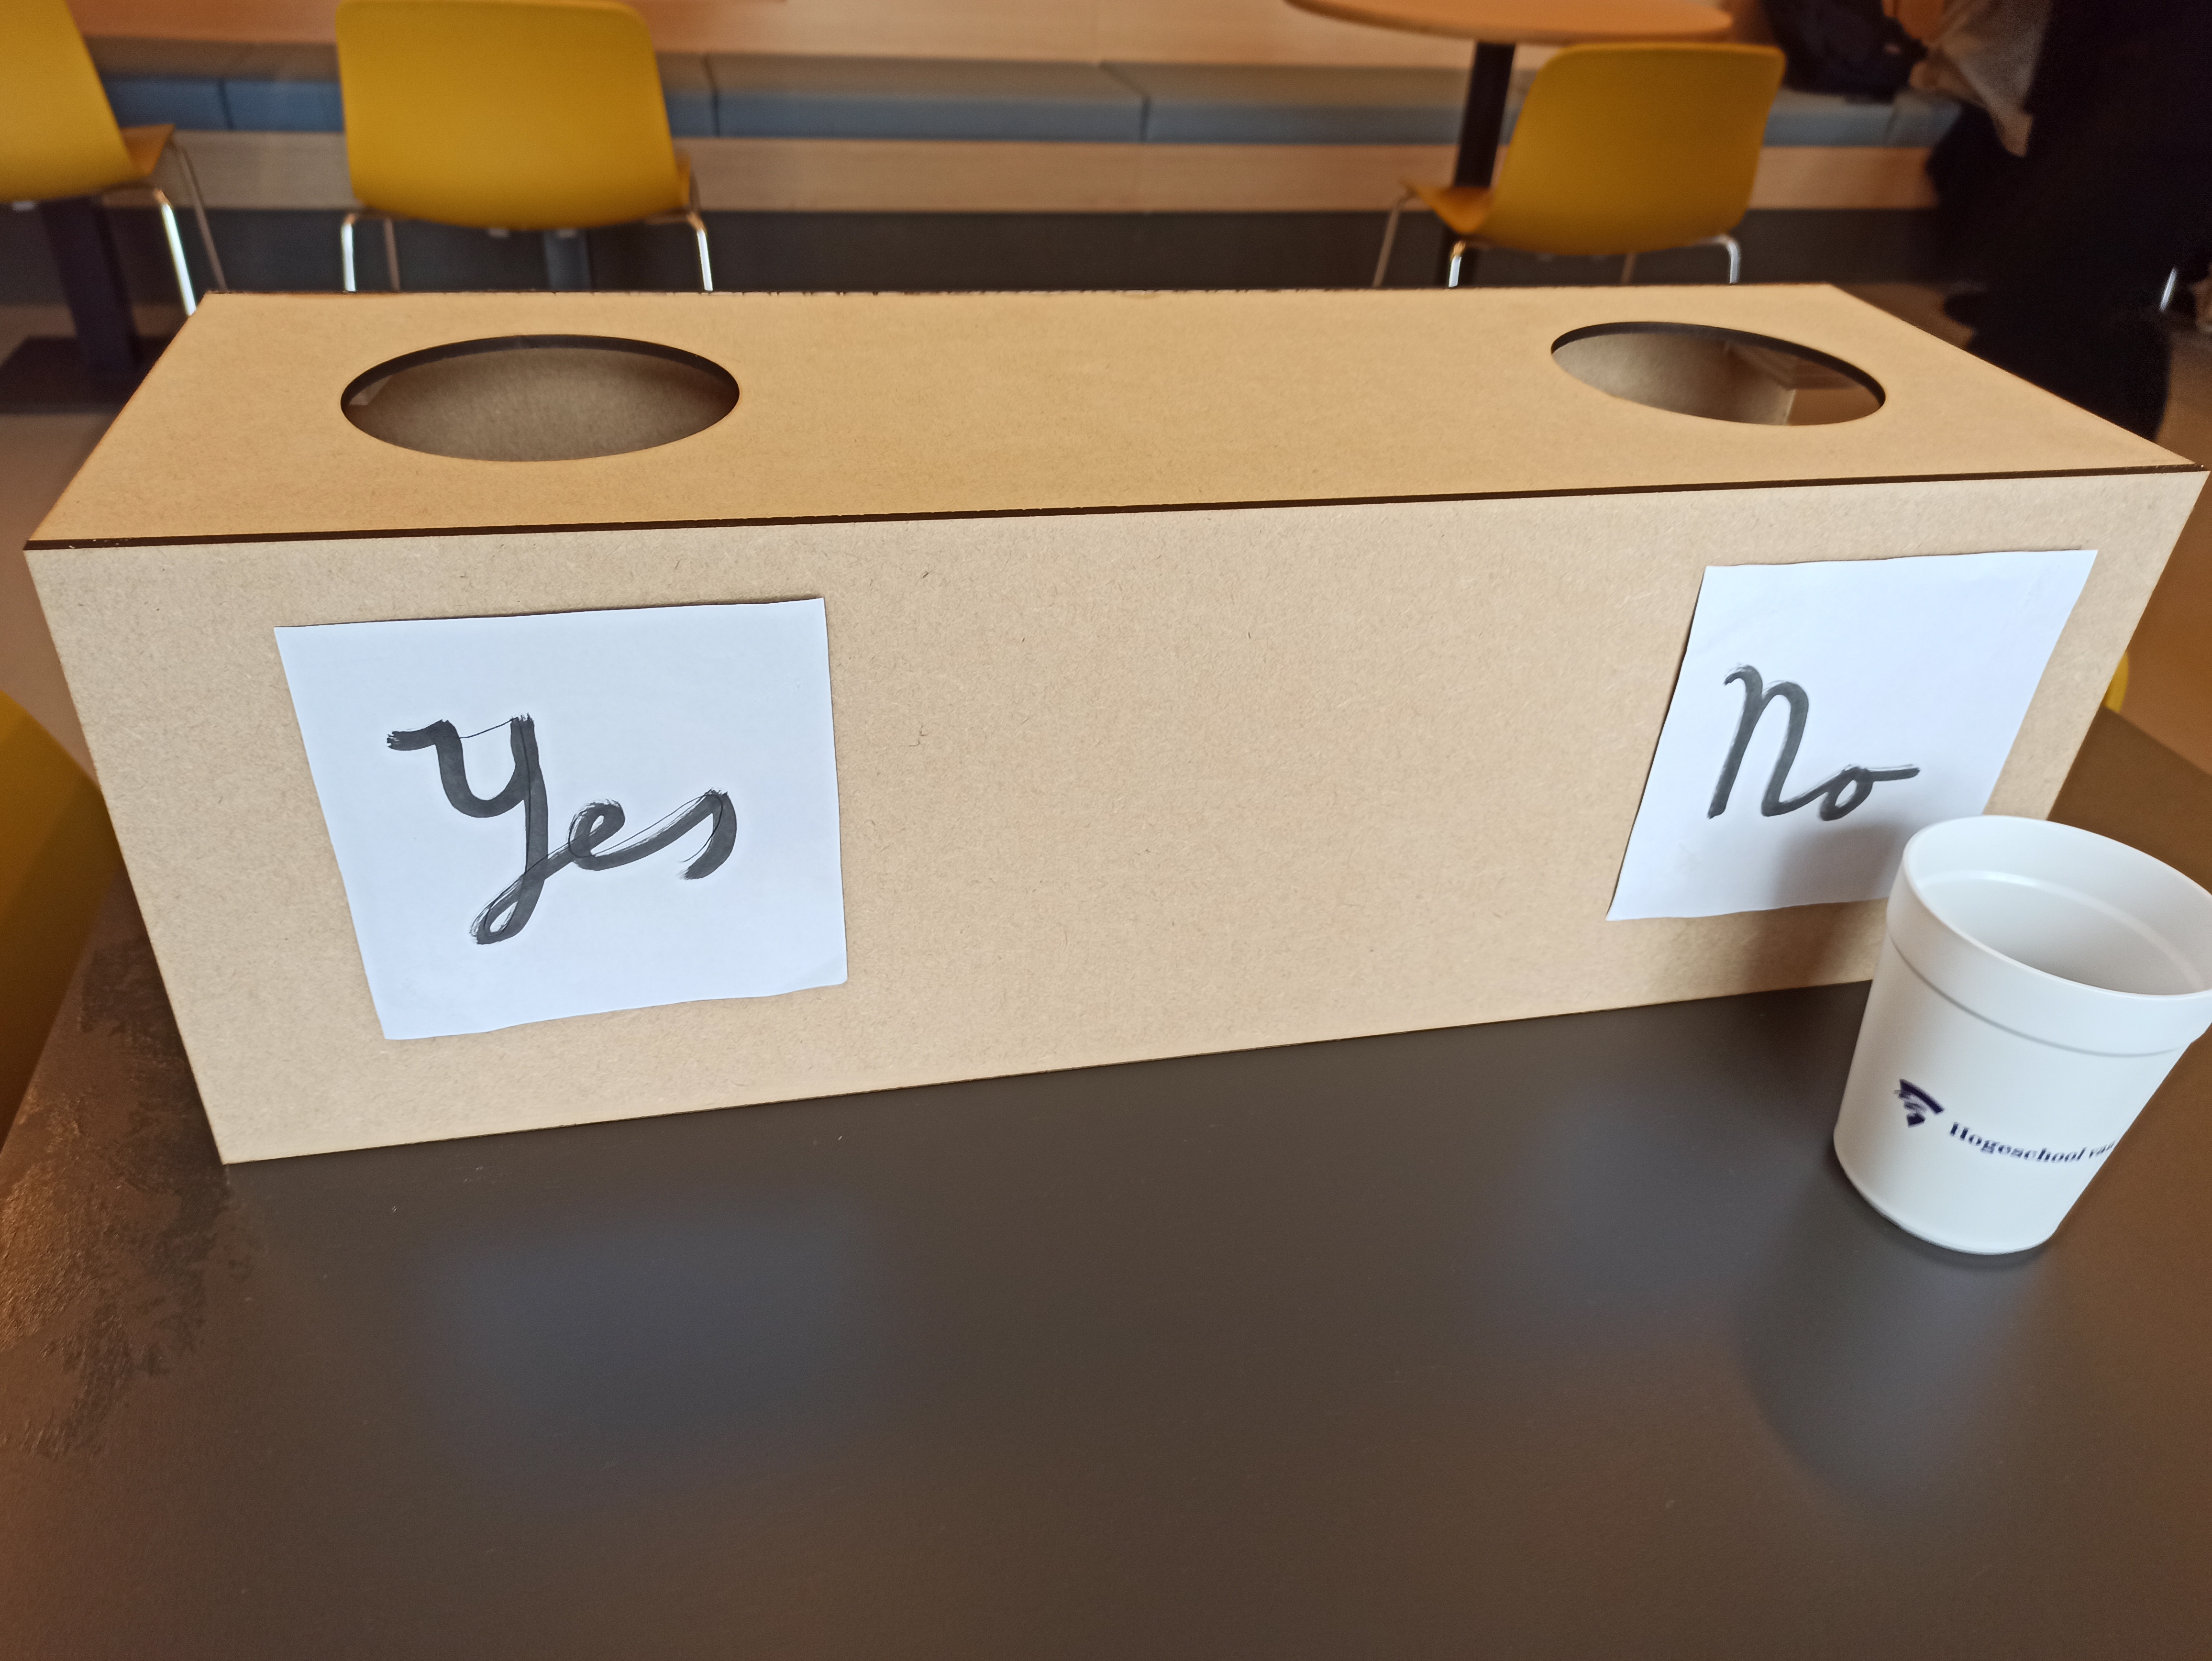
As a User, I want to be able to drop cups in a hole on the physical device, so that I can give my answer
For this I designed a simple 3D box in which a user can drop cups. I then exported these to be used by the laser cutter.
Then I worked with Diego to make this design with the laser cutter. Which all worked out great. The final design can be viewed here:
Question select
PUT Request
To properly implement an update for the questions table, I wanted to use HTTP PUT. Since this is normally used for updating. To do this I read an article which explains how to make such a request. It simply meant changing the request method in a JavaScript fetch. I also added a PUT request handler in the questions API endpoint, so it would automatically go to that function.
Stored procedures & Triggers
I wanted to automatically unselect the previously selected questions, when selecting a new question. To implement this I first started with an after update trigger, to change the previously selected question. However I then encountered an error, which basically said that it is not possible to update a row in a after update trigger.
Therefore I opted for a stored procedure in the database design itself, which does the action mentioned before. In hindsight I did not need to implement this with a stored procedure, and could have simply done this within PHP. Nonetheless I did learn more about how stored procedures and triggers work in SQL.
Design & User experience
For the UX part I was looking at how to properly sort the table. At first I sorted it by selected, but this did not work very well, since it then rearranged the whole table. Therefore I opted to just sort it in descending order. So newly added entries are added on top.
I also added a highlight for the 'selected' question, so it is more easily readable if a question is selected. For this I did some research into Bootstrap to get a better idea on how to add this. The final design is as follows:

Finishing Sprint 2 prototype
Lastly I worked on the following user story:
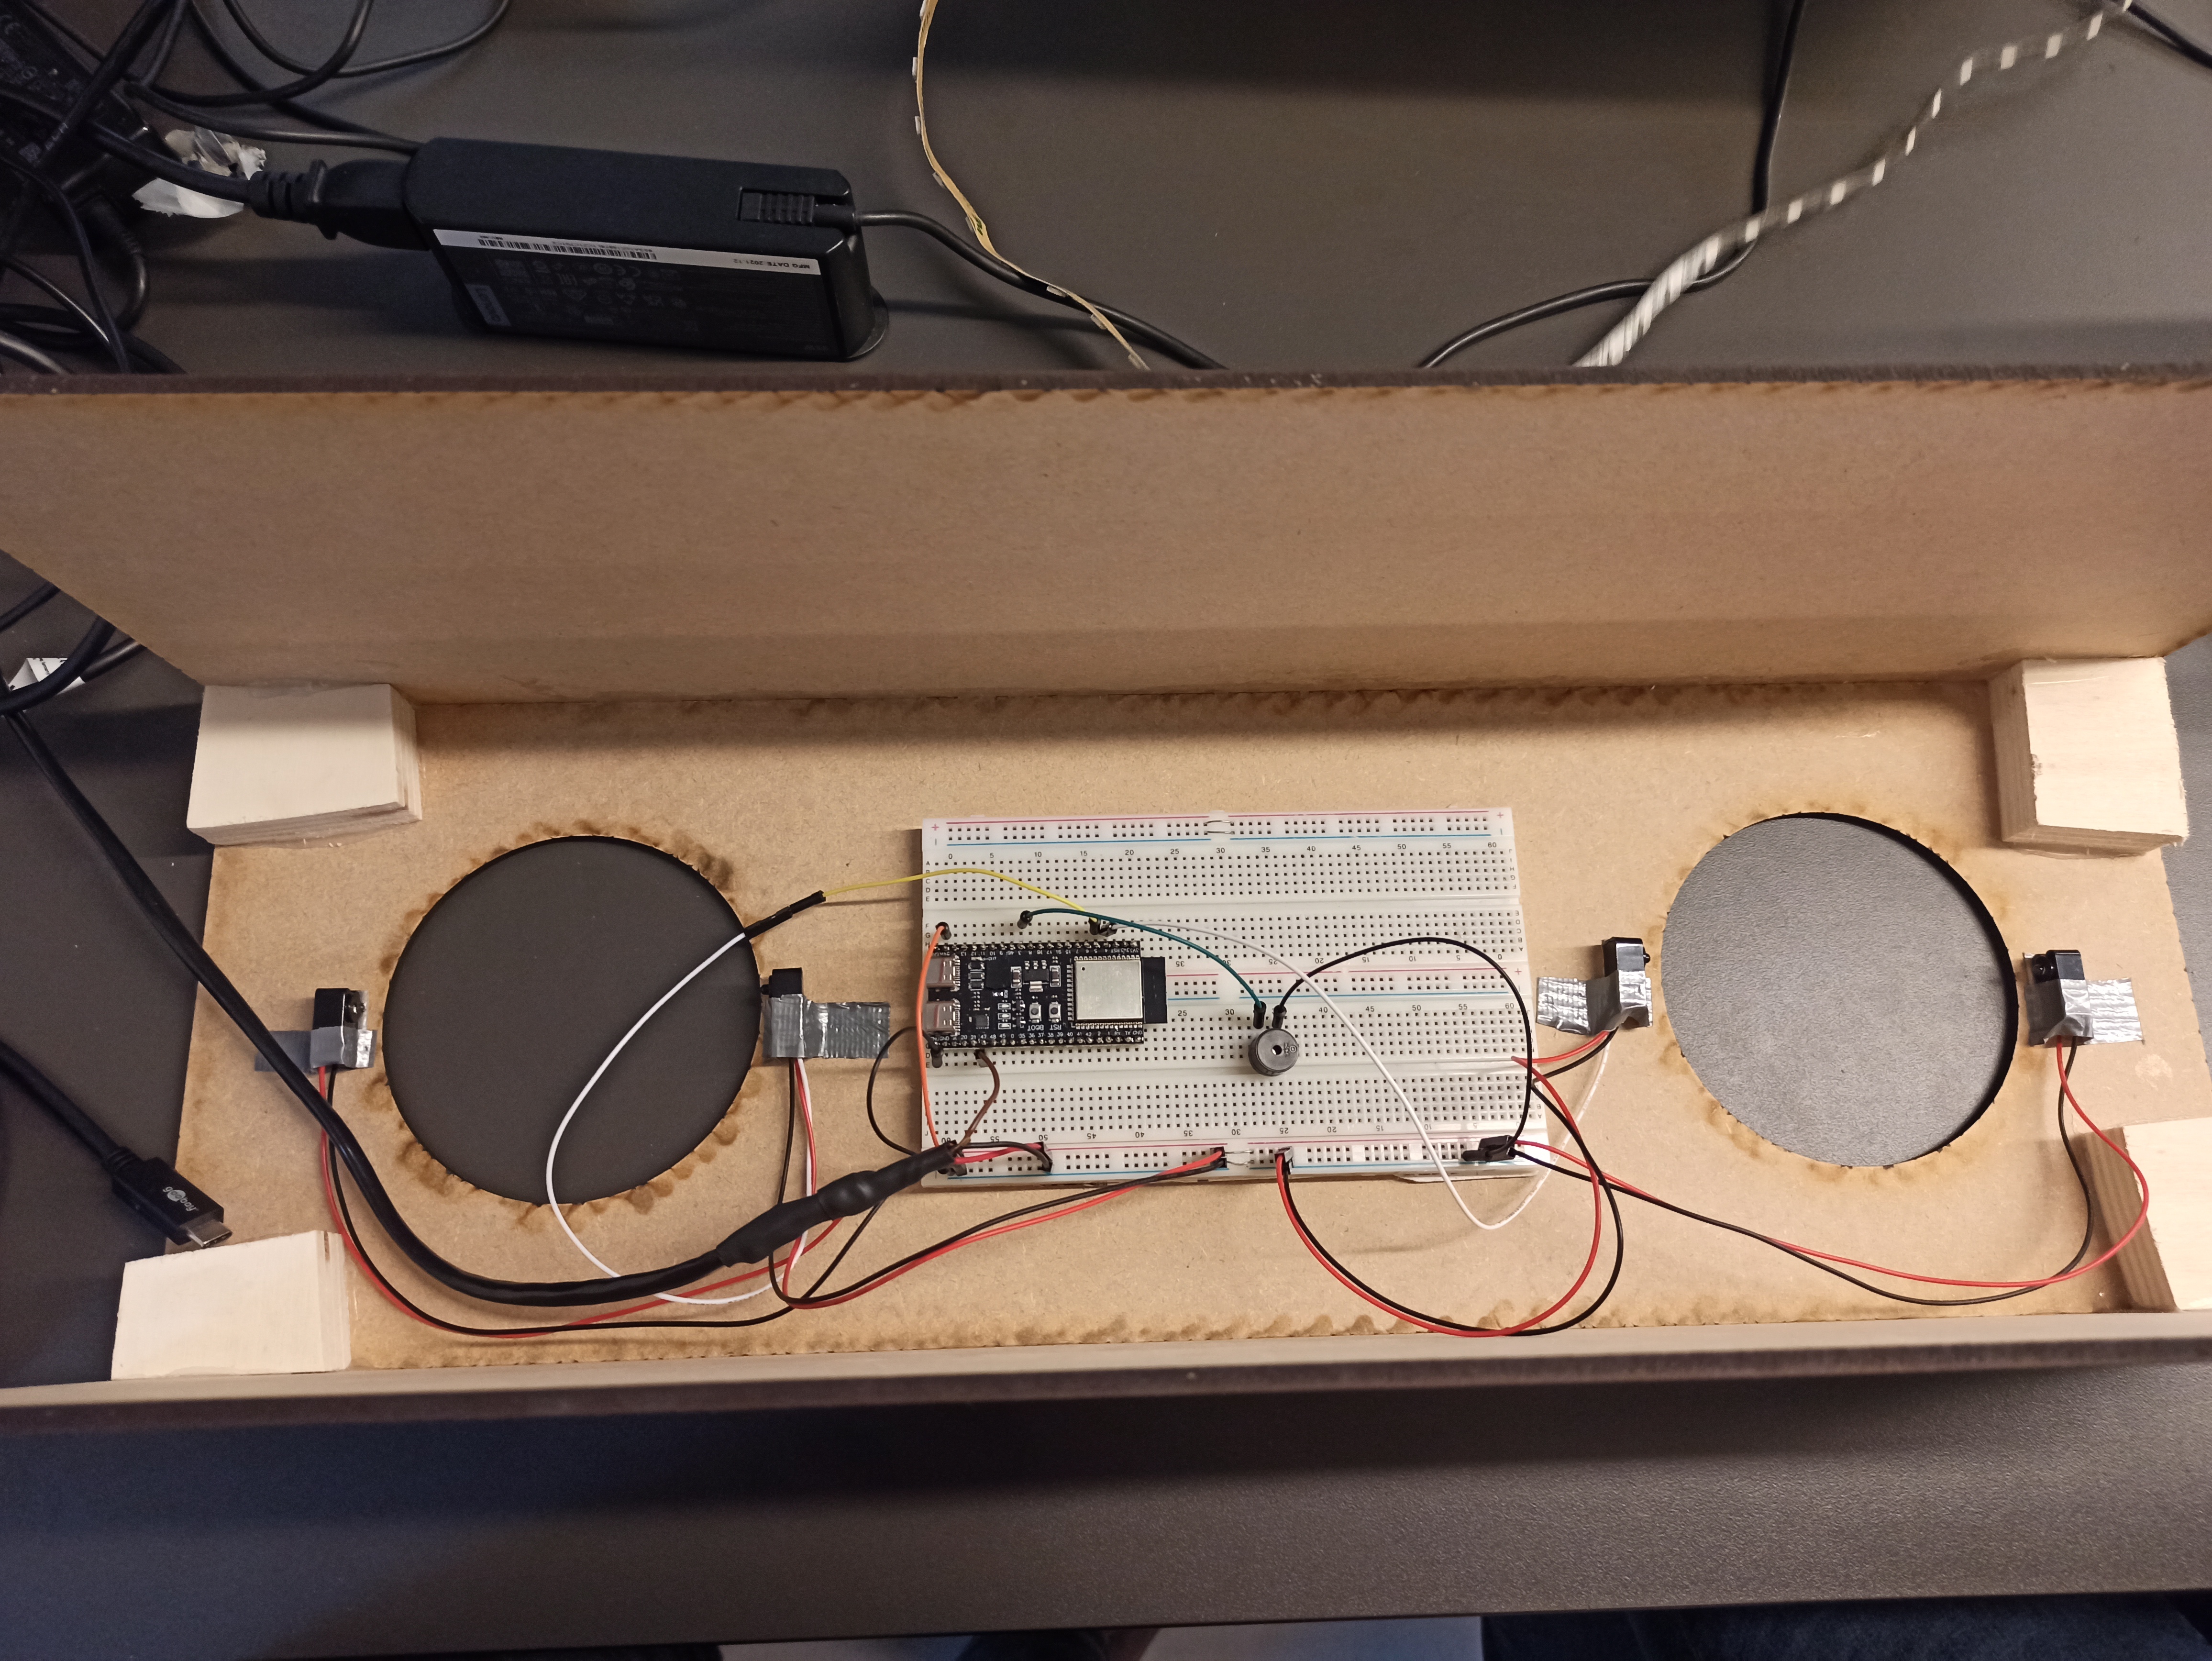
As a User, I want to all the components to be integrated, so that I can actually use the device.
This user story was all about assembling the prototype for the Sprint 2 review. For this I had to change some code in main.ino and mount the sensors on the device. This can be seen below.
Week 8
This week started with the sprint preparation, which I spent most of Monday on.
Polling for selected question
I worked on the following user story:
As a User, I want the meter to update when selecting another question, so that it correctly displays the answers on the selected question.
One functionality of the device is the servo meter which indicates a mean of all the answers given to the selected question. However our embedded device does not know which answer is currently selected in the backend. Therefore I needed to make a listener, which listens to changes in the selected question.
For this I modified the questions API endpoint to add a parameter to only get the selected question. And then modified the URL in the embedded device to send this parameter.
To listen to changes I needed to poll every couple seconds to get the selected question. However this caused significant delays in the normal functionality of the device. To fix this I opted to use a different core of the ESP32, to do the polling. For this I followed this tutorial.
After moving the listener to this different core, everything works fine.
I also had some issue with the servo not working properly. I found out this had to do with the buzzer interfering with the timer of the servo, so I used a different library for the tone function, to make assign it to a different timer.
YES/NO Meter design
I also worked on the following user story:
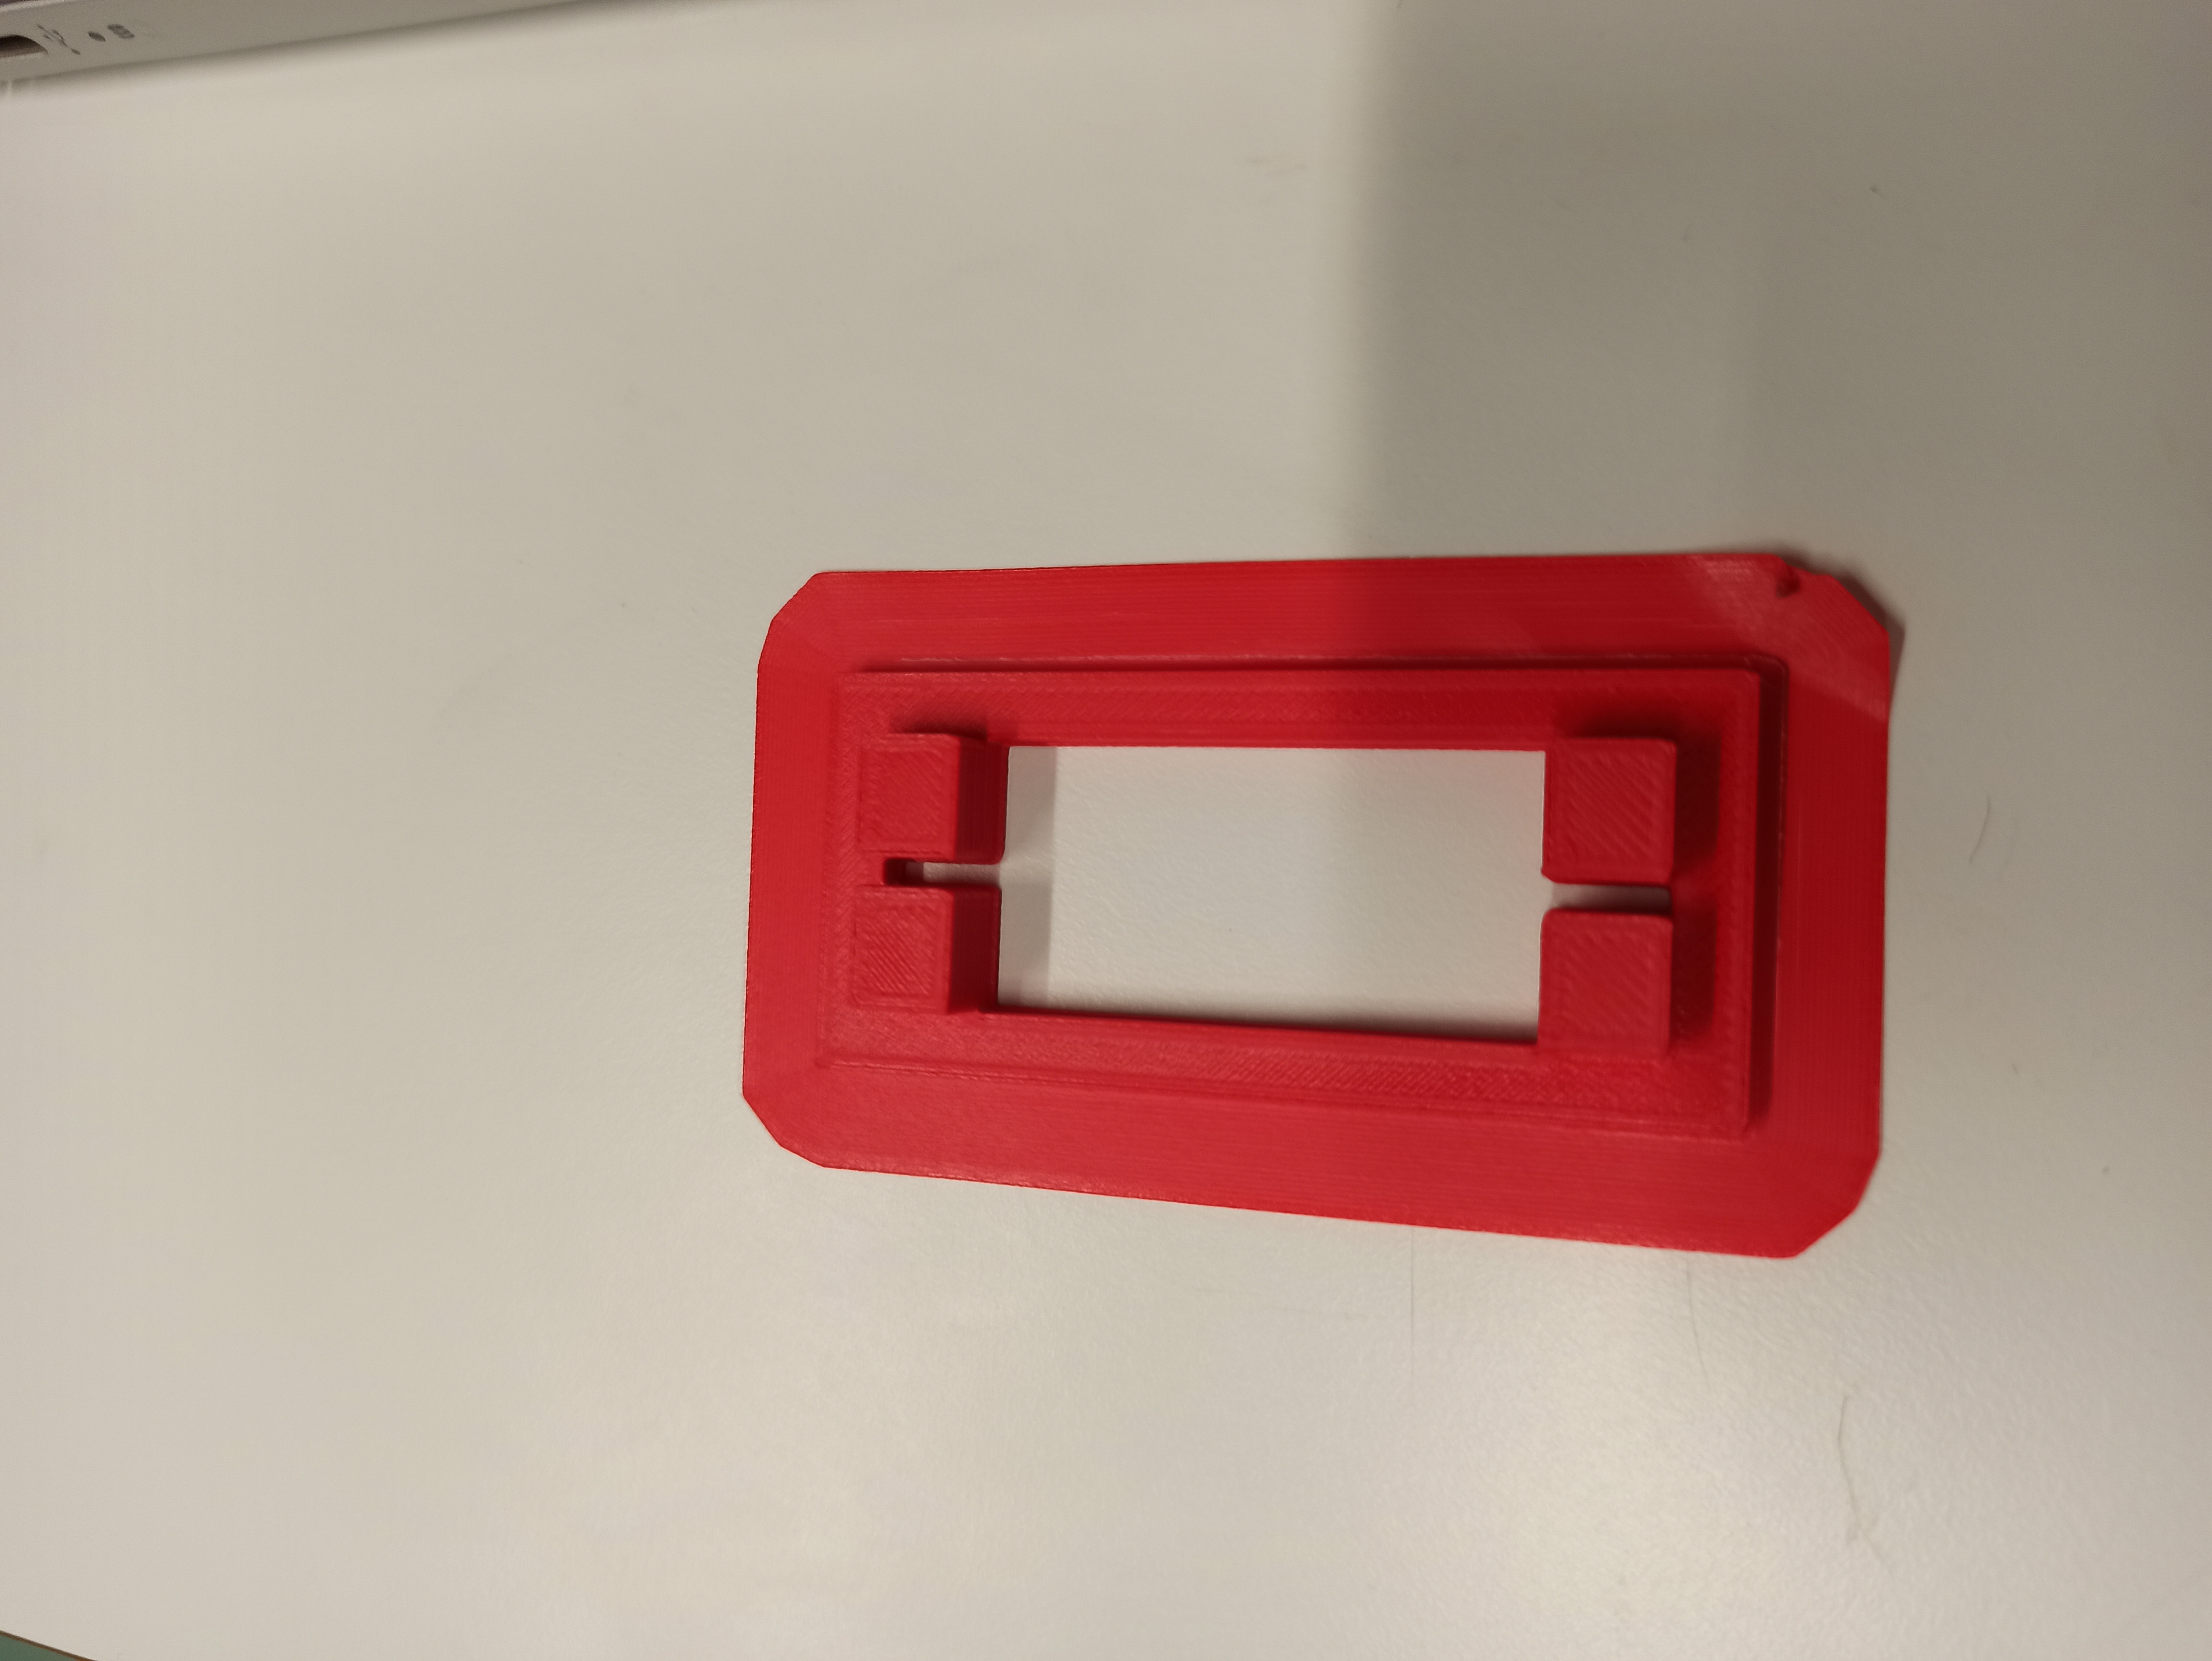
As a User, I want to have a clear design of the physical meter, so that I know what the positions of servo mean.
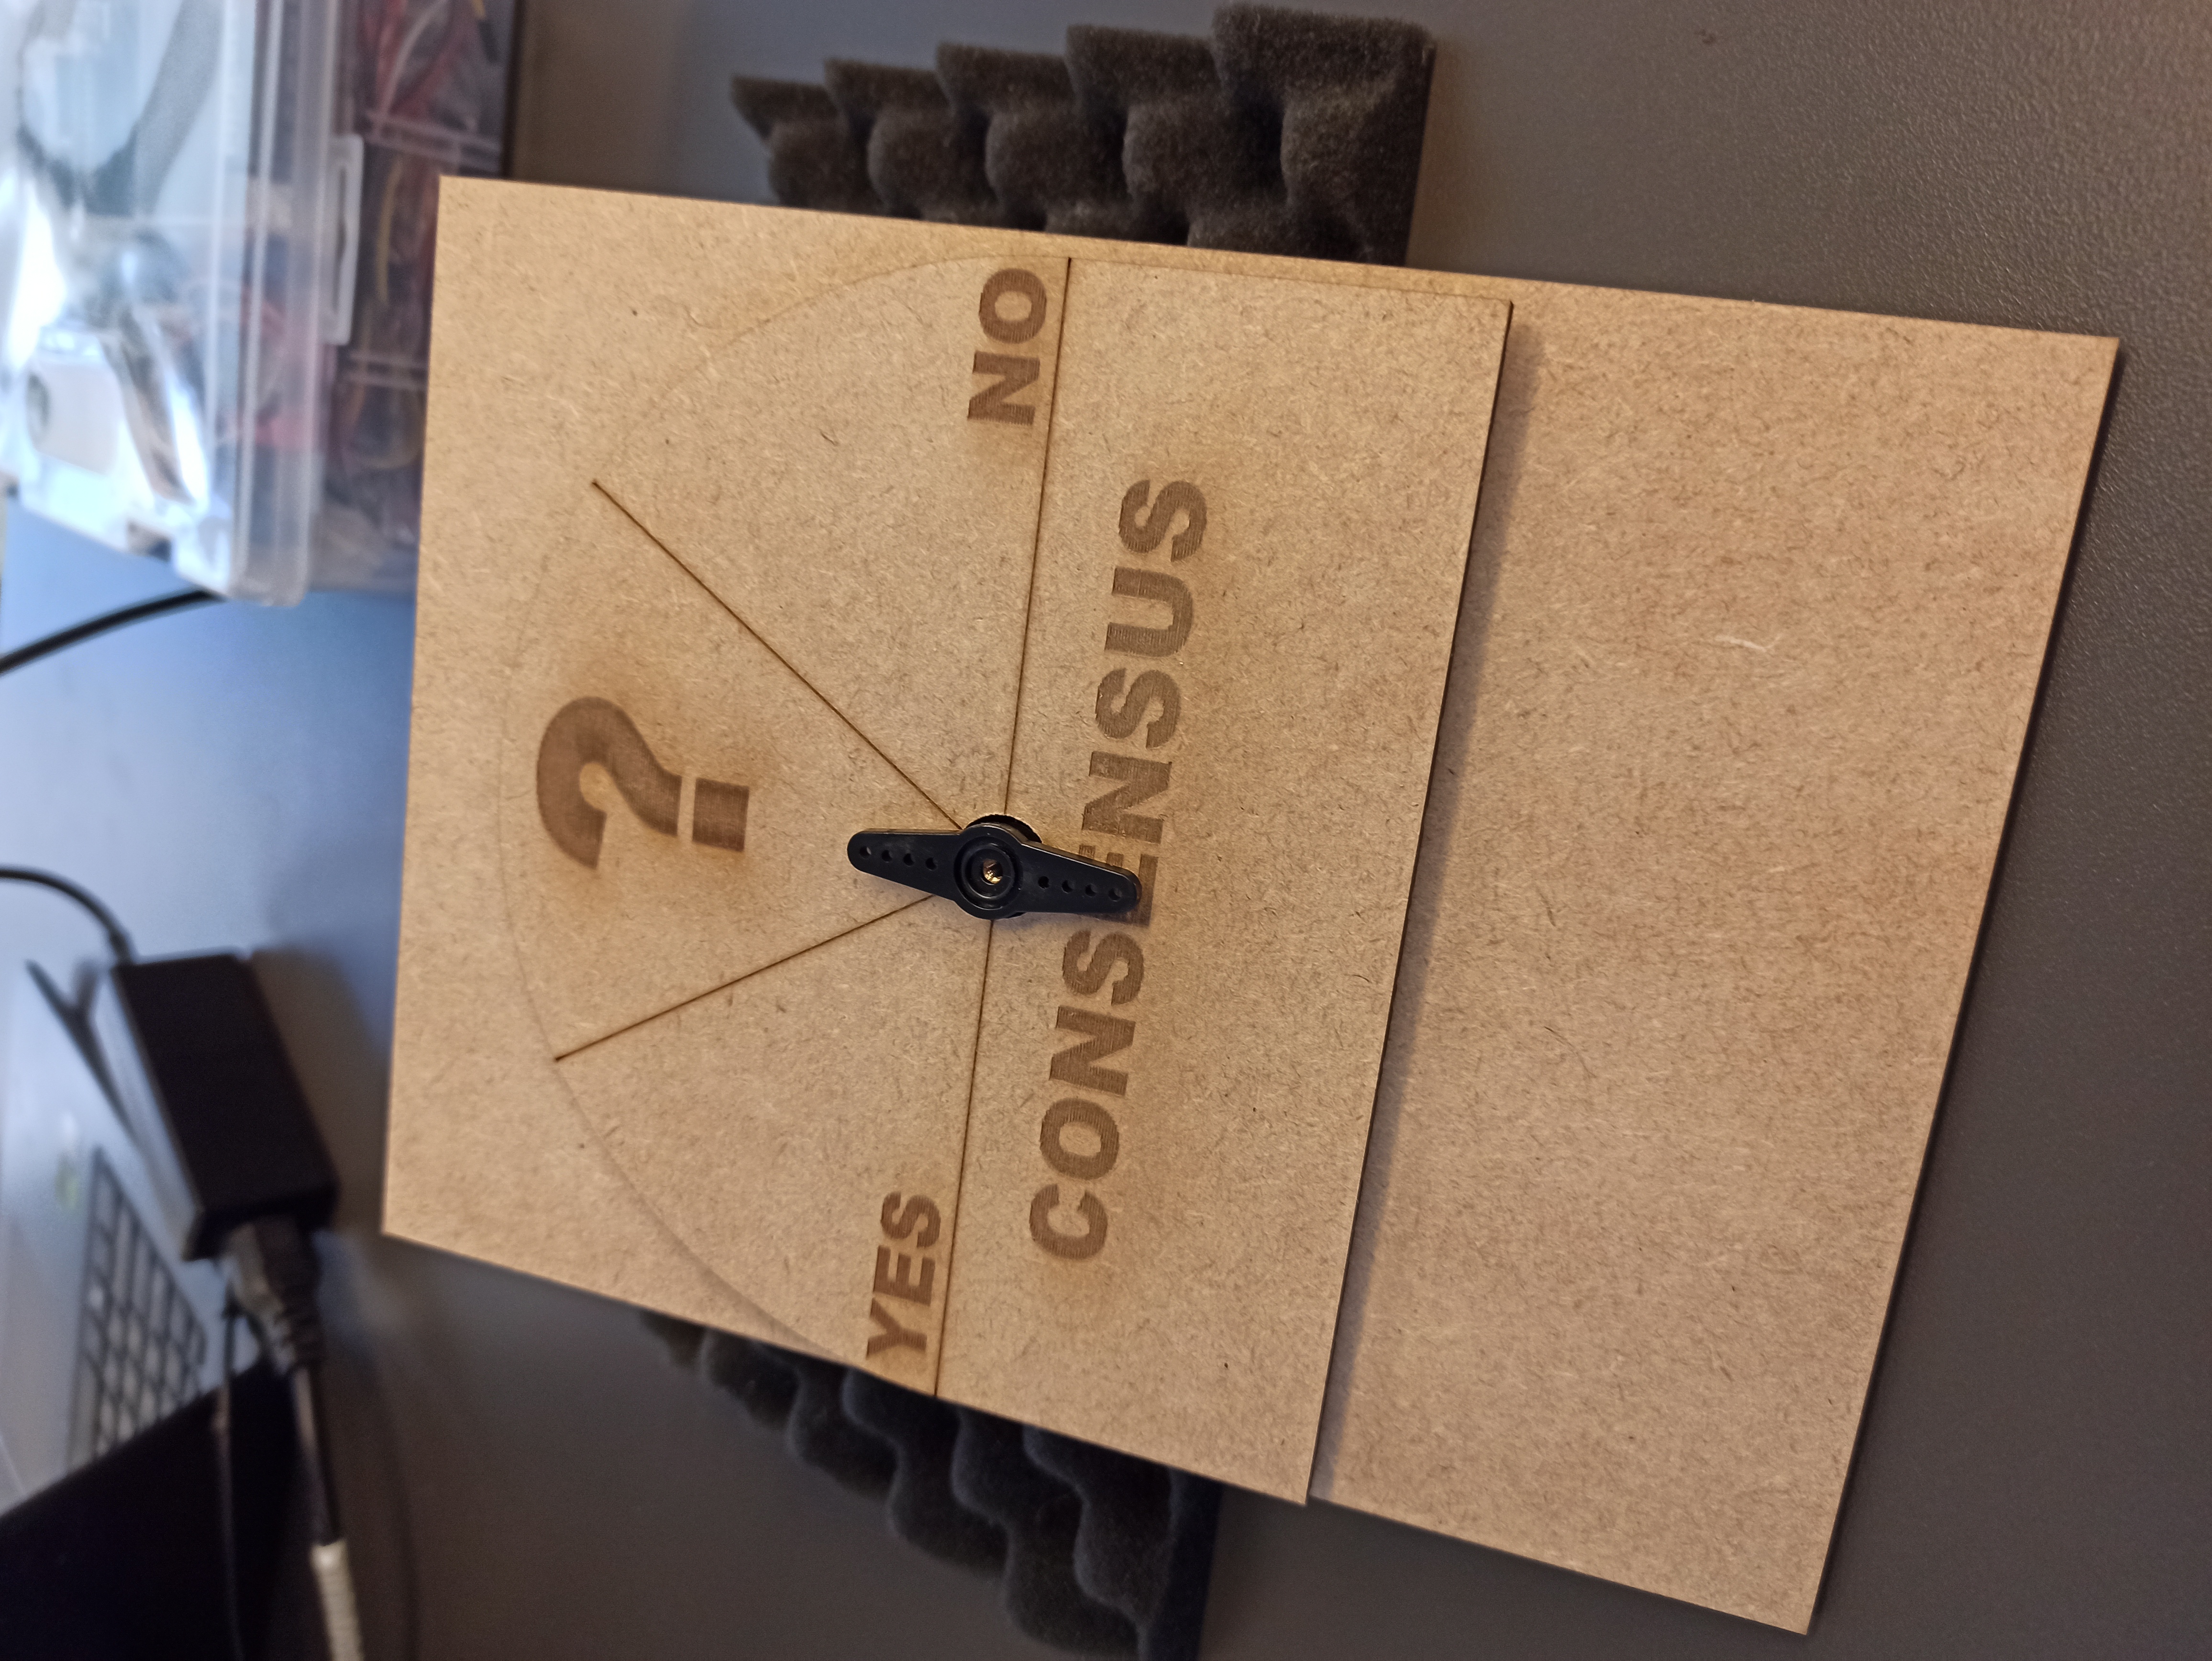
This included making a frame and design for the meter. For this I also needed to make bracket to attach the servo to the sign. This bracket I have made with a 3D printer, as can be seen below:
Next I made the frame on which the meter must reside and the background design of the meter itself. I made this with the laser cut machine. To make the design I also had to learn how to engrave and cut lines into the wood.
The main parameters of the laser cut device are: speed & power. With regular cutting, the power will be high and the speed low, so that it cuts completely through the wood. However, to engrave you must have a very high speed, and lower power, this way it does not completely cut through the wood and go very fast and you will get the engraving. The same counts for engraving lines, here the speed is higher and the power lower.
After doing all this I was left with the following result:
Week 9
Table Pagination
I worked on the following user story:
As a User, I want to have pagination on the questions table, so that the webpage will look consistent even when having a lot of questions stored.
For this I had to learn how to actually implement this. I quickly realized it can be easily implemented with Bootstrap Table. Here you can simply set pagination to true.
However, this first required our entire table to be implemented in a Bootstrap Table, since we did not have this at first. This cost some effort in figuring out how to display our data in this new table and I had to find ways to implement previously made functions, like deleting/selecting, in this new table. For this I had to make an extra column with buttons, which trigger the update/delete functions.
Overall I greatly improved the design and functionality. And I learnt a lot more about how to implement Bootstrap tables.
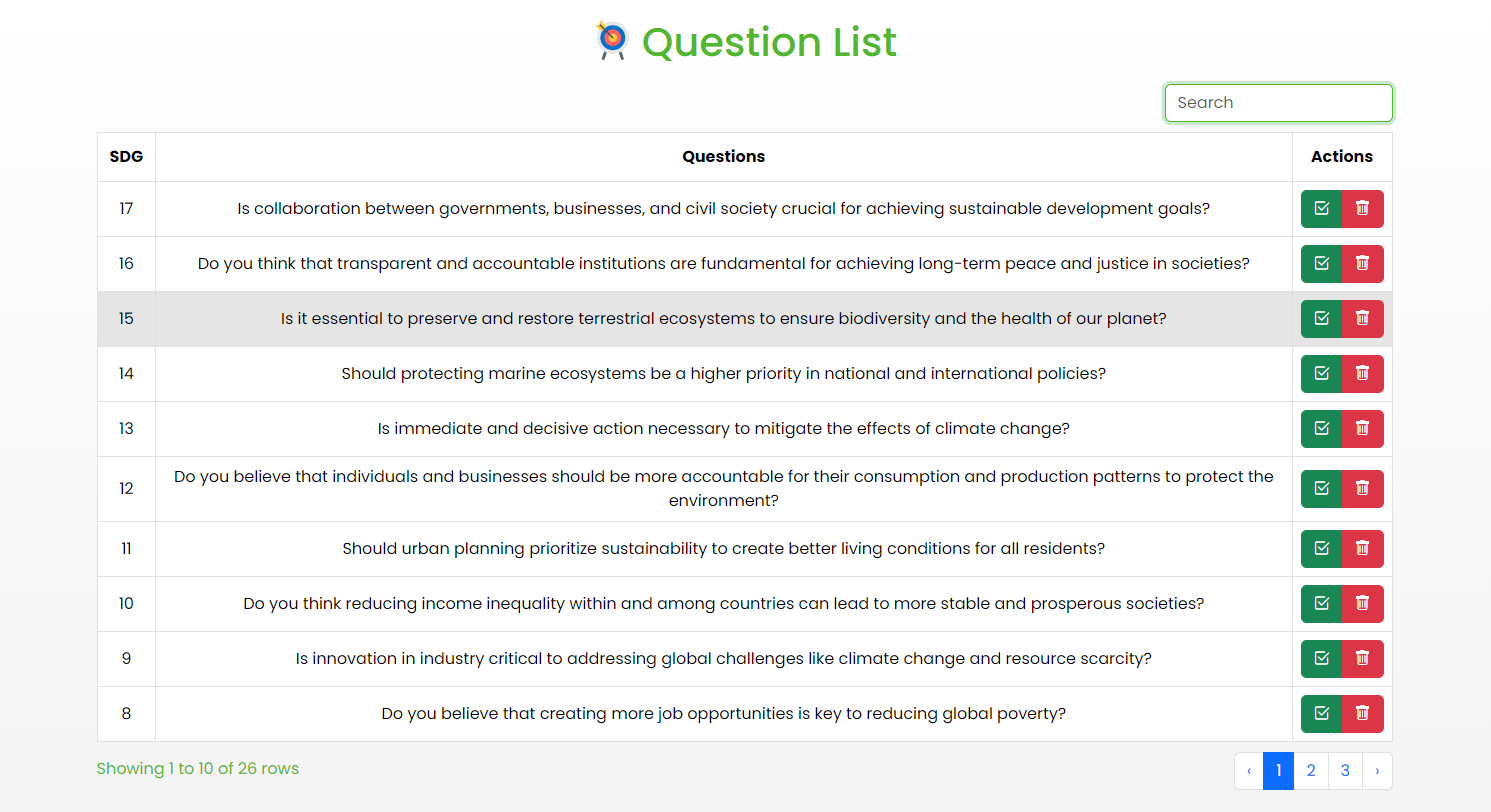
Website redesign
I also worked on the following user story:
As a User, I want the website to have a more understandable design, so that I can more easily see what the necessary data
This entailed redesigning the whole website. For this I made a learning story on how to properly implement Bootstrap. During the redesign I had to remove a lot of elements and styling in order to make it consistent using Bootstrap. I mainly learned a lot about grids & cards and how to properly implement these.
Furthermore I added a bar which shows the selected question, which is also stuck to the top of the page and also a footer. We also had some bugs with the question deletion and the chart not appearing when there were only answers of one type, I fixed these. I also fixed the page which is to be displayed on the tablet, since this was dependant on some old css styling, so I changed it a bit.
Overall the webpage now looks like this:
Prototype assembly
Lastly I also worked on assembly of the device it self. For this I had to design some brackets for the IR sensor. The end product looks as follows: